By: T09-2 Since: Feb 2019 Licence: MIT
1. Introduction
1.1. What is Tasketch
Tasketch is an application that helps you to manage your everyday time by giving you an overview of all the time planned
for all the tasks in a daily manner. It also helps you to be aware of all the tasks dateline too.
This application is designed for the busy NUS students who have many tasks, assignments and datelines everyday.
Tasketch uses minimal (GUI) elements, instead opting for a faster Command Line Interface (CLI) while maintaining the
benefits of the GUI. So, if you are used to the command line, Tasketch is sure to help manage your time effectively.
This developer guide is introducing the development structure of Tasketch and provide a better understanding of how this project works. Jump to the [Quick Start] to get started. Enjoy!
2. Setting up
2.1. Prerequisites
-
JDK
9or laterJDK 10on Windows will fail to run tests in headless mode due to a JavaFX bug. Windows developers are highly recommended to use JDK9. -
IntelliJ IDE
IntelliJ by default has Gradle and JavaFx plugins installed.
Do not disable them. If you have disabled them, go toFile>Settings>Pluginsto re-enable them.
2.2. Setting up the project in your computer
-
Fork this repo, and clone the fork to your computer
-
Open IntelliJ (if you are not in the welcome screen, click
File>Close Projectto close the existing project dialog first) -
Set up the correct JDK version for Gradle
-
Click
Configure>Project Defaults>Project Structure -
Click
New…and find the directory of the JDK
-
-
Click
Import Project -
Locate the
build.gradlefile and select it. ClickOK -
Click
Open as Project -
Click
OKto accept the default settings -
Open a console and run the command
gradlew processResources(Mac/Linux:./gradlew processResources). It should finish with theBUILD SUCCESSFULmessage.
This will generate all resources required by the application and tests. -
Open
MainWindow.javaand check for any code errors-
Due to an ongoing issue with some of the newer versions of IntelliJ, code errors may be detected even if the project can be built and run successfully
-
To resolve this, place your cursor over any of the code section highlighted in red. Press ALT+ENTER, and select
Add '--add-modules=…' to module compiler optionsfor each error
-
-
Repeat this for the test folder as well (e.g. check
HelpWindowTest.javafor code errors, and if so, resolve it the same way)
2.3. Verifying the setup
-
Run the
seedu.address.MainAppand try a few commands -
Run the tests to ensure they all pass.
2.4. Configurations to do before writing code
2.4.1. Configuring the coding style
This project follows oss-generic coding standards. IntelliJ’s default style is mostly compliant with ours but it uses a different import order from ours. To rectify,
-
Go to
File>Settings…(Windows/Linux), orIntelliJ IDEA>Preferences…(macOS) -
Select
Editor>Code Style>Java -
Click on the
Importstab to set the order-
For
Class count to use import with '*'andNames count to use static import with '*': Set to999to prevent IntelliJ from contracting the import statements -
For
Import Layout: The order isimport static all other imports,import java.*,import javax.*,import org.*,import com.*,import all other imports. Add a<blank line>between eachimport
-
2.4.2. Setting up CI
Set up Travis to perform Continuous Integration (CI) for your fork. See UsingTravis.adoc to learn how to set it up.
After setting up Travis, you can optionally set up coverage reporting for your team fork (see UsingCoveralls.adoc).
| Coverage reporting could be useful for a team repository that hosts the final version but it is not that useful for your personal fork. |
Optionally, you can set up AppVeyor as a second CI (see UsingAppVeyor.adoc).
| Having both Travis and AppVeyor ensures your App works on both Unix-based platforms and Windows-based platforms (Travis is Unix-based and AppVeyor is Windows-based) |
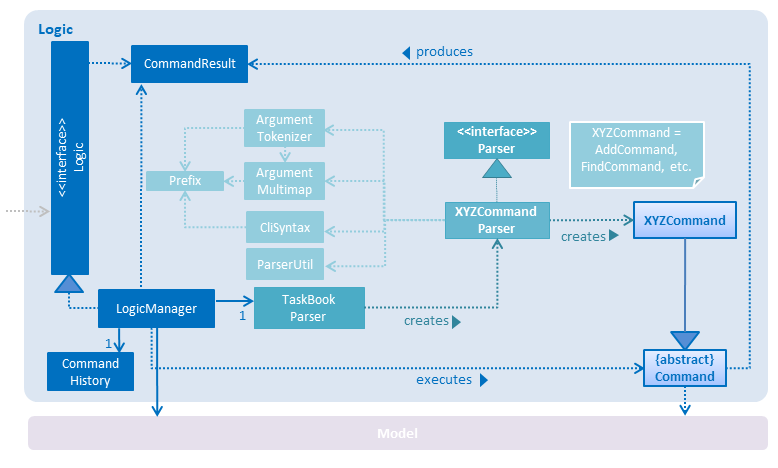
3. Design
3.1. Architecture

The Architecture Diagram given above explains the high-level design of the App. Given below is a quick overview of each component.
The .pptx files used to create diagrams in this document can be found in the diagrams folder. To update a diagram, modify the diagram in the pptx file, select the objects of the diagram, and choose Save as picture.
|
Main has only one class called MainApp. It is responsible for,
-
At app launch: Initializes the components in the correct sequence, and connects them up with each other.
-
At shut down: Shuts down the components and invokes cleanup method where necessary.
Commons represents a collection of classes used by multiple other components.
The following class plays an important role at the architecture level:
-
LogsCenter: Used by many classes to write log messages to the App’s log file.
The rest of the App consists of four components.
Each of the four components
-
Defines its API in an
interfacewith the same name as the Component. -
Exposes its functionality using a
{Component Name}Managerclass.
For example, the Logic component (see the class diagram given below) defines it’s API in the Logic.java interface and exposes its functionality using the LogicManager.java class.
How the architecture components interact with each other
The Sequence Diagram below shows how the components interact with each other for the scenario where the user issues the command delete 1.
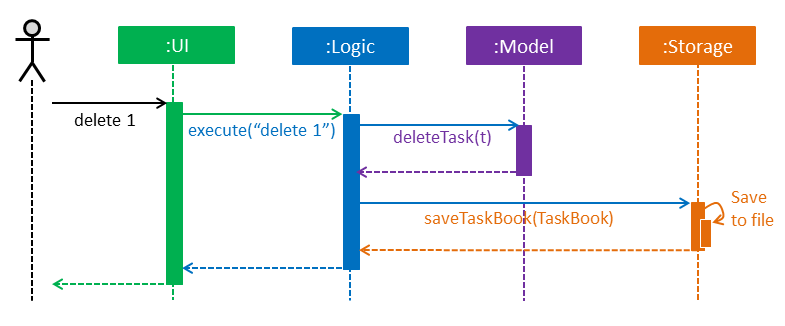
delete 1 commandThe sections below give more details of each component.
3.2. UI component
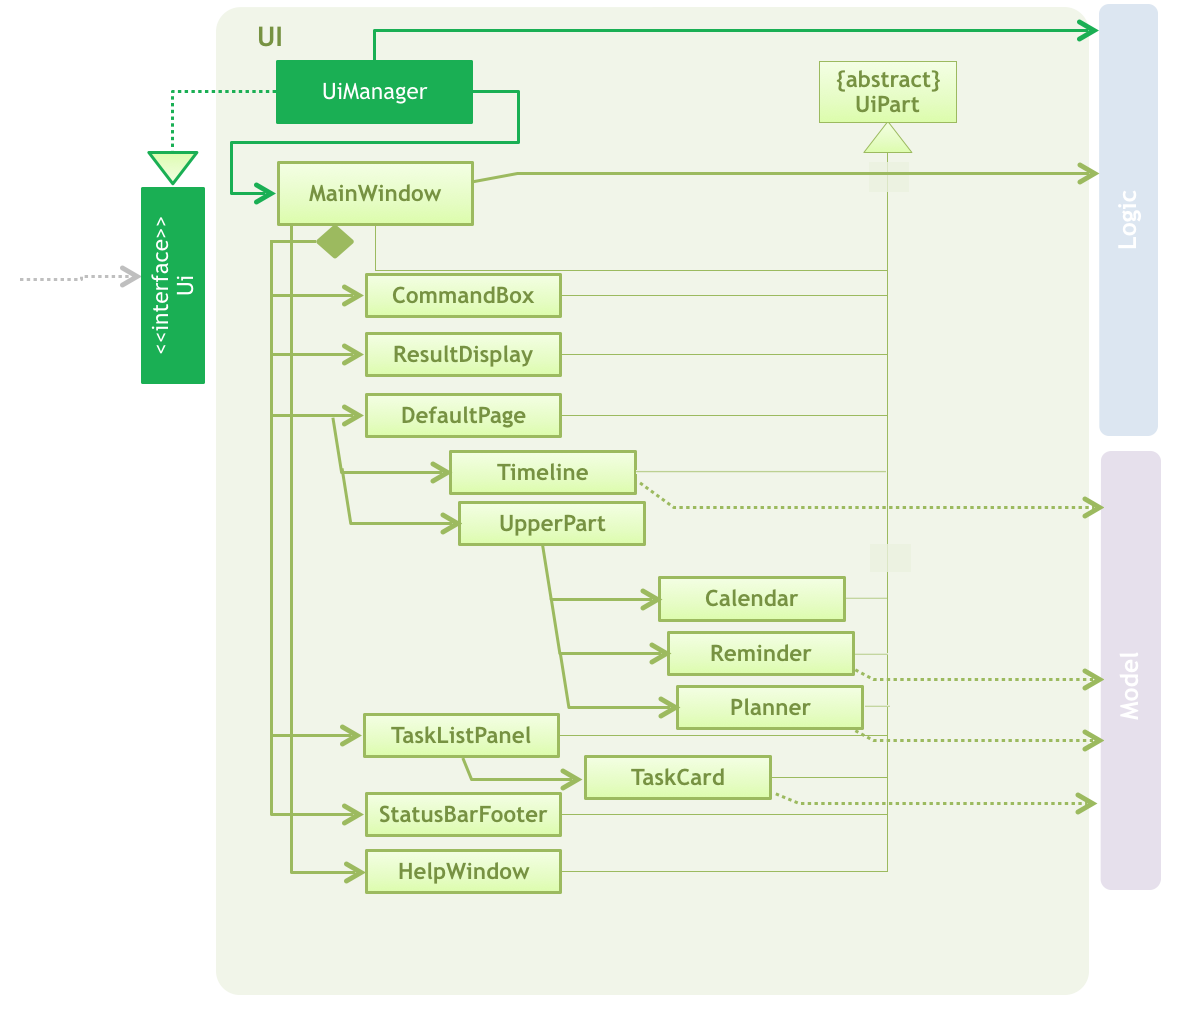
API : Ui.java
The UI consists of a MainWindow that is made up of parts e.g.CommandBox, ResultDisplay, TaskListPanel, StatusBarFooter, DefaultPage etc. All these, including the MainWindow, inherit from the abstract UiPart class.
The UI component uses JavaFx UI framework. The layout of these UI parts are defined in matching .fxml files that are in the src/main/resources/view folder. For example, the layout of the MainWindow is specified in MainWindow.fxml
The UI component,
-
Executes user commands using the
Logiccomponent. -
Listens for changes to
Modeldata and feedback to user so that the UI can be updated with the modified data. -
Consists of 5 parts in MainWindow, 1 part in HelpWindow.
-
The default page consists of UpperPart and Timeline.
-
UpperPart consists of Calendar, Reminder and Planner which are arranged in sequence.
-
Timeline and reminder are exceptions for updating with model’s changes, please see the implementation for these two part.
-
3.3. Logic component
API :
Logic.java
-
Logicuses theTaskBookParserclass to parse the user command. -
This results in a
Commandobject which is executed by theLogicManager. -
The command execution can affect the
Model(e.g. adding a person) andUIsince some UI parts depends on the execution result. -
The result of the command execution is encapsulated as a
CommandResultobject which is passed back to theUi. -
In addition, the
CommandResultobject can also instruct theUito perform certain actions, such as displaying help to the user.
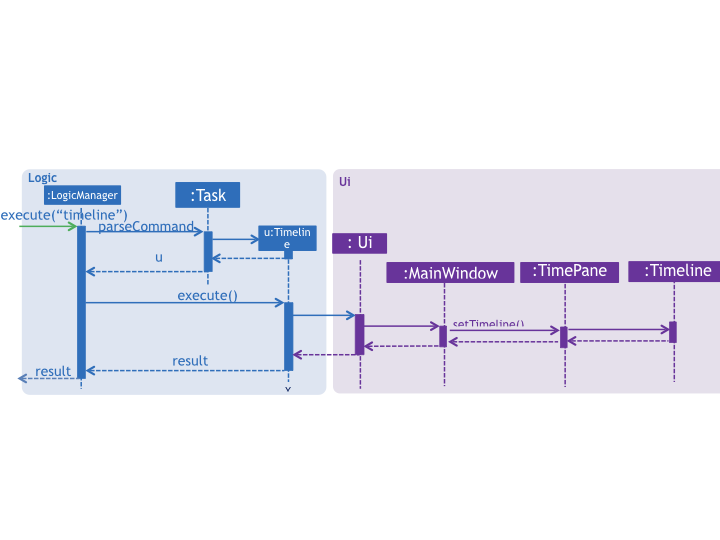
Given below is the Sequence Diagram for interactions within the Logic component for the execute("
add n/CS2113 task sd/13-03-19 st/12.00 ed/13-03-19 et/14.00 d/Talk about version control c/a") API call.
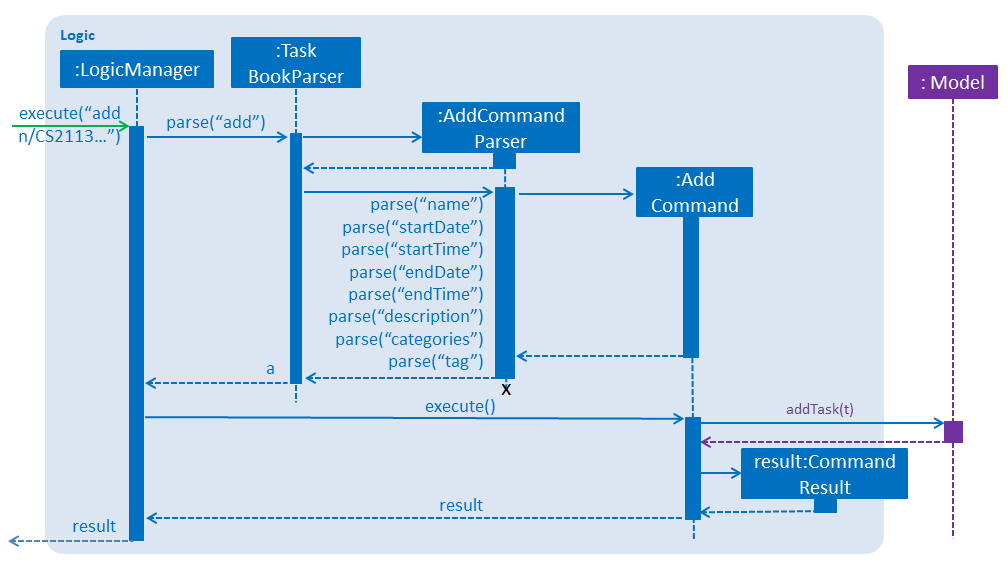
add n/CS2113… Command3.4. Model component
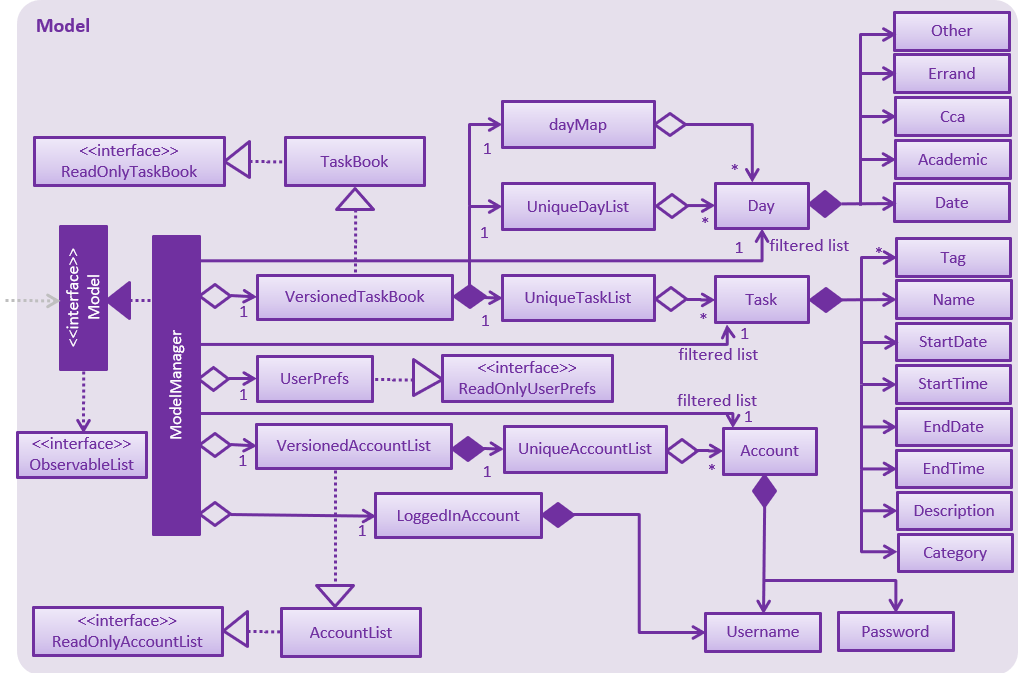
API : Model.java
The Model,
-
stores a
UserPrefobject that represents the user’s preferences. -
stores the Task Book and Account List data.
-
stores currently logged in Account.
-
exposes an unmodifiable
ObservableList<Task>that can be 'observed' e.g. the UI can be bound to this list so that the UI automatically updates when the data in the list change. -
exposes an unmodifiable
ObservableList<Day>that can be 'observed' e.g. the UI can be bound to this list so that the UI automatically updates when the data in the list change. -
does not depend on any of the other three components.
As a more OOP model, we can store a Tag list in Task Book, which Task can reference. This would allow Task Book to only require one Tag object per unique Tag, instead of each Task needing their own Tag object. An example of how such a model may look like is given below.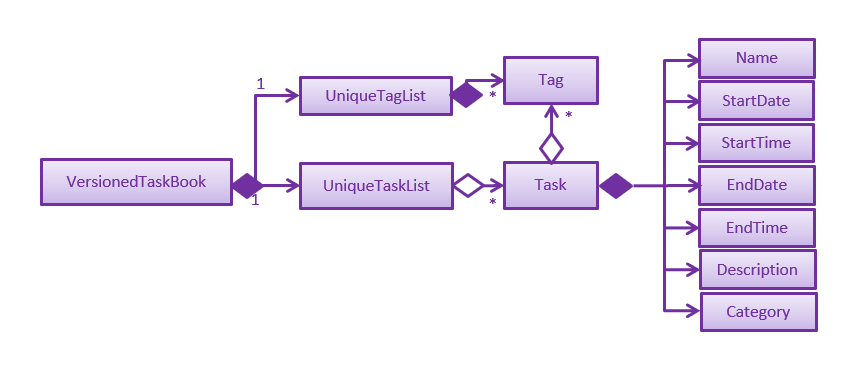
|
3.5. Storage component
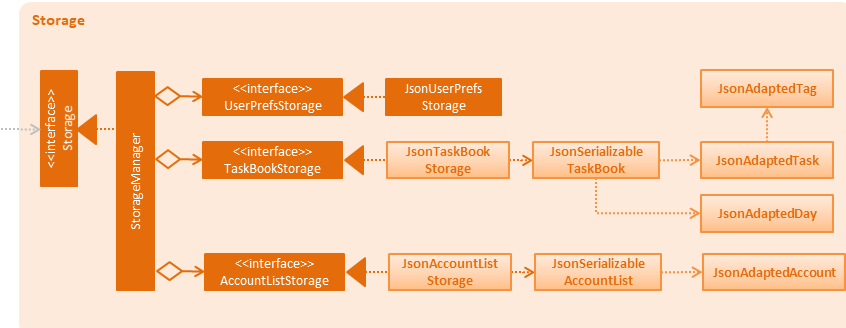
API : Storage.java
The Storage component,
-
can save
UserPrefobjects in json format and read it back. -
can save the Task Book data in json format and read it back.
-
can save the Account List data in json format and read it back.
3.6. Common classes
Classes used by multiple components are in the seedu.addressbook.commons package.
4. Implementation
This section describes some noteworthy details on how certain features are implemented.
4.1. Login feature
The login feature will unlock all commands for the users, otherwise the user can only execute following commands:
-
login -
loginStatus -
listAccounts -
findAccount -
help -
history -
exist
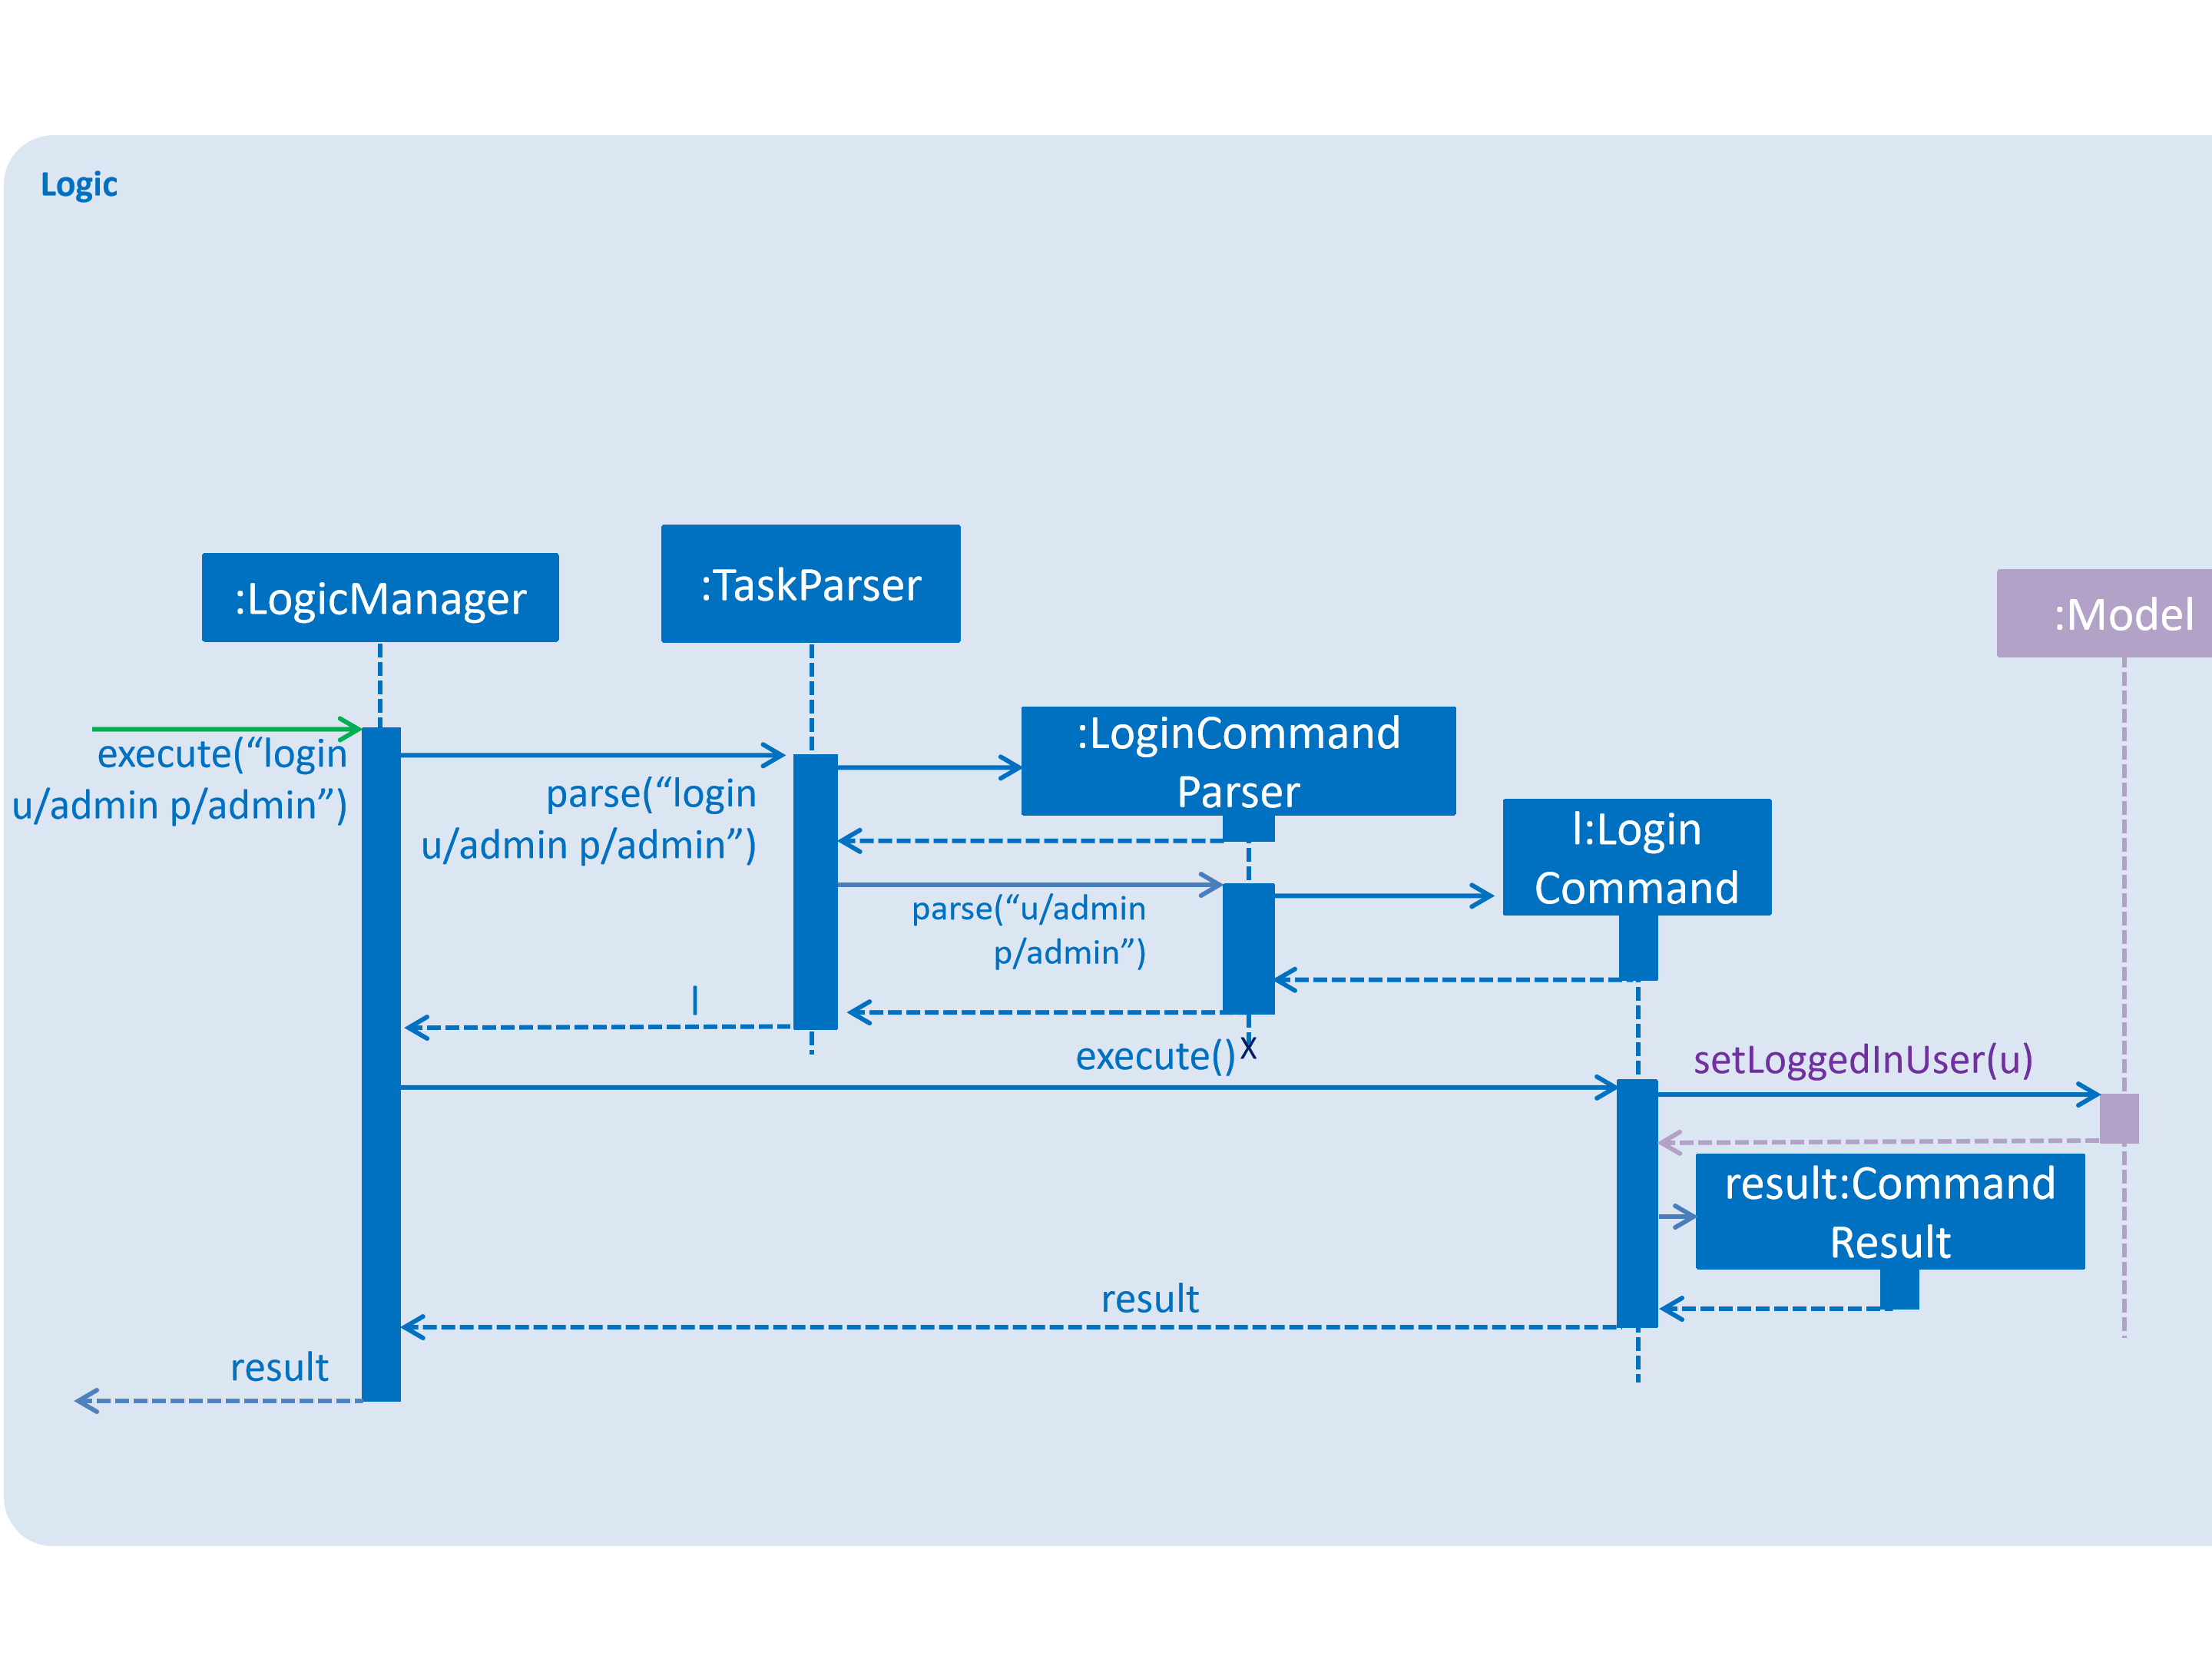
4.1.1. Current Implementation
The login mechanism is facilitated by LoginCommand. It extends Command and implements the following operations:
-
LoginCommand#modifyLoginStatus()— checks whether there exists such username and corresponding password in accountlist. If troue, updates the logged in account status in Model accordingly. -
LoginCommand#execute()— calls LoginCommand#modifyLoginStatus(). Then, checks login status in Model and displays a login success message if true and displays a failure message otherwise.
These operations are exposed in the Model interface as Model#setLoggedInUser() and Model#getLoginStatus() respectively.
Given below is an example usage scenario and how the LoginCommand mechanism behaves at each step.
Step 1: The user executes login u/admin p/admin command to log into Tasketch. The username and admin are both "admin".
Step 2: The execute command calls Model#getLoginStatus() and checks whether the user has already logged in with an account. If true, execute throws a CommandException notifying the user that he is already logged in.
Step 3: The execute command then calls LoginCommand#modifyLoginStatus().It checks whether the username "admin" and its corresponding password "admin" exists in the accountlist.
Step 4: If there exists such an account, LoginCommand#modifyLoginStatus() calls Model#setLoggedInUser() which updates the logged in account status in model with the logged in account set to admin and logged in status set to true.
Step 5: The login command checks the login status according to Model#getLoginStatus(). A success message is printed if true; otherwise a failure message is printed.
The following sequence diagram shows how the login operation works:
4.1.2. Design Considerations
Aspect: How login executes
-
Alternative 1 (current choice): Check against various accounts stored in a file and allow access if match.
-
Pros: It allows multiple accounts to access to Taskbook.
-
Cons: It may cost more memory to store the account list.
-
-
Alternative 2: Checks against a single account that can be modified.
-
Pros: It will use less memory.
-
Cons: Only one account can access to Taskbook. If the user accidently loses the account, the whole application may be locked up.
-
4.2. Versioned Tasketch feature
4.2.1. Current Implementation
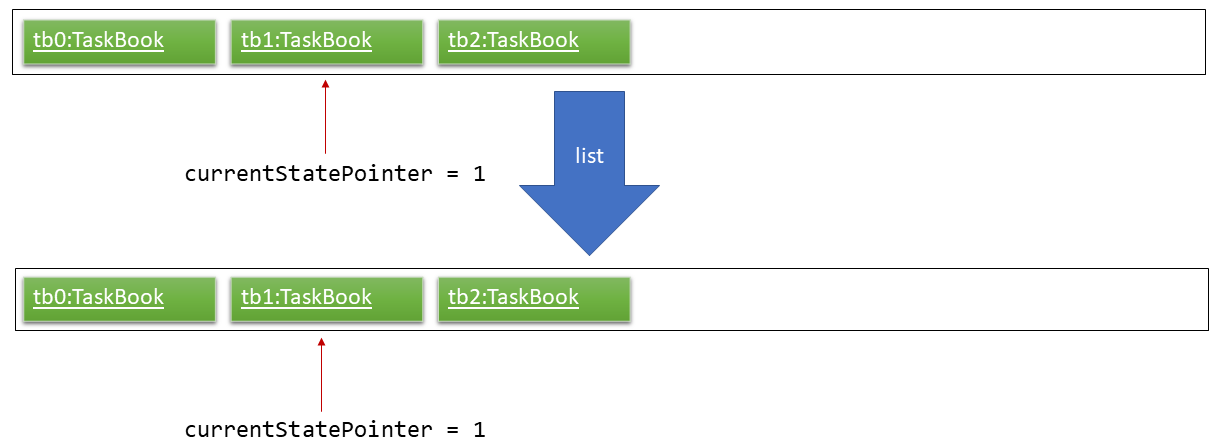
The undo/redo mechanism is facilitated by VersionedTaskBook.
It extends TaskBook with an undo/redo history, stored internally as an taskBookStateList and currentStatePointer.
Additionally, it implements the following operations:
-
VersionedTaskBook#commit()— Saves the current task book state in its history. -
VersionedTaskBook#undo()— Restores the previous task book state from its history. -
VersionedTaskBook#redo()— Restores a previously undone task book state from its history.
These operations are exposed in the Model interface as Model#commitTaskBook(), Model#undoTaskBook() and Model#redoTaskBook() respectively.
Given below is an example usage scenario and how the undo/redo mechanism behaves at each step.
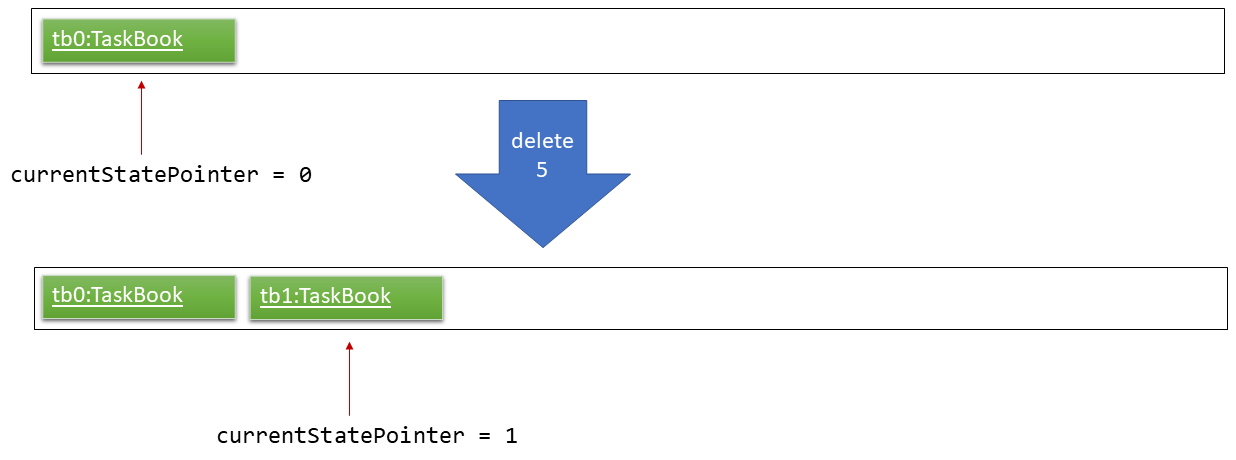
Step 1: The user launches the application for the first time. The VersionedTaskBook will be initialized with the initial task book state, and the currentStatePointer pointing to that single task book state.

Step 2: The user executes delete 5 command to delete the 5th task in the task book. The delete command calls Model#commitTaskBook(), causing the modified state of the task book after the delete 5 command executes to be saved in the taskBookStateList, and the currentStatePointer is shifted to the newly inserted task book state.
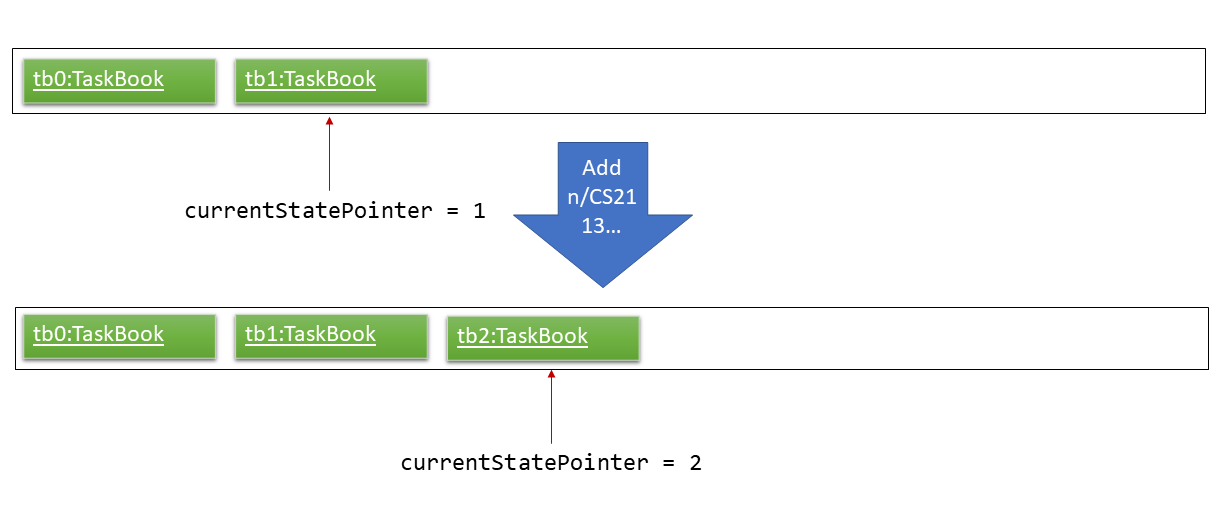
Step 3: The user executes add n/Do CS2113 … to add a new task. The add command also calls Model#commitTaskBook(), causing another modified task book state to be saved into the taskBookStateList.
If a command fails its execution, it will not call Model#commitTaskBook(), so the task book state will not be saved into the taskBookStateList.
|
Step 4: The user now decides that adding the task was a mistake, and decides to undo that action by executing the undo command. The undo command will call Model#undoTaskBook(), which will shift the currentStatePointer once to the left, pointing it to the previous task book state, and restores the task book to that state.
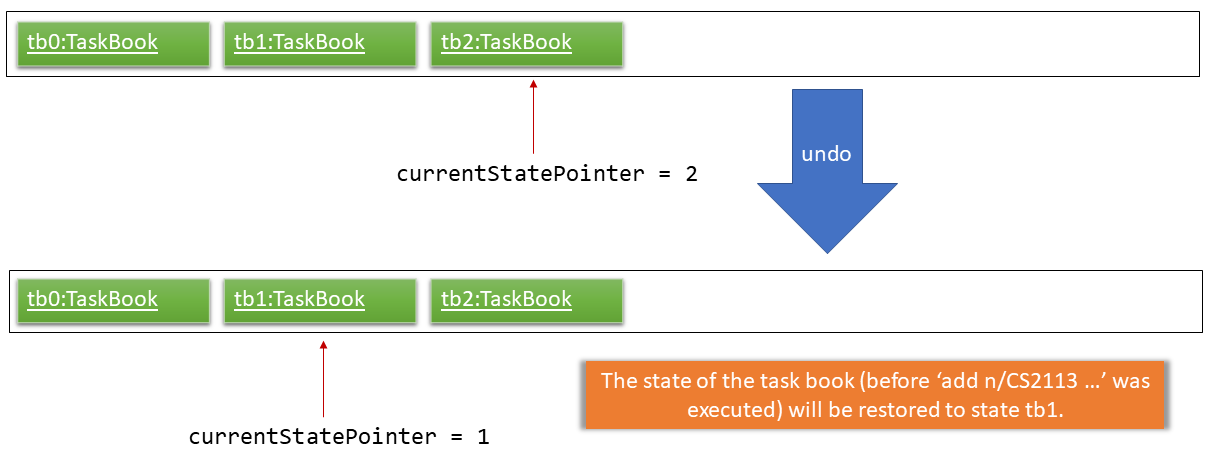
If the currentStatePointer is at index 0, pointing to the initial task book state, then there are no previous task book states to restore. The undo command uses Model#canUndoTaskBook() to check if this is the case. If so, it will return an error to the user rather than attempting to perform the undo.
|
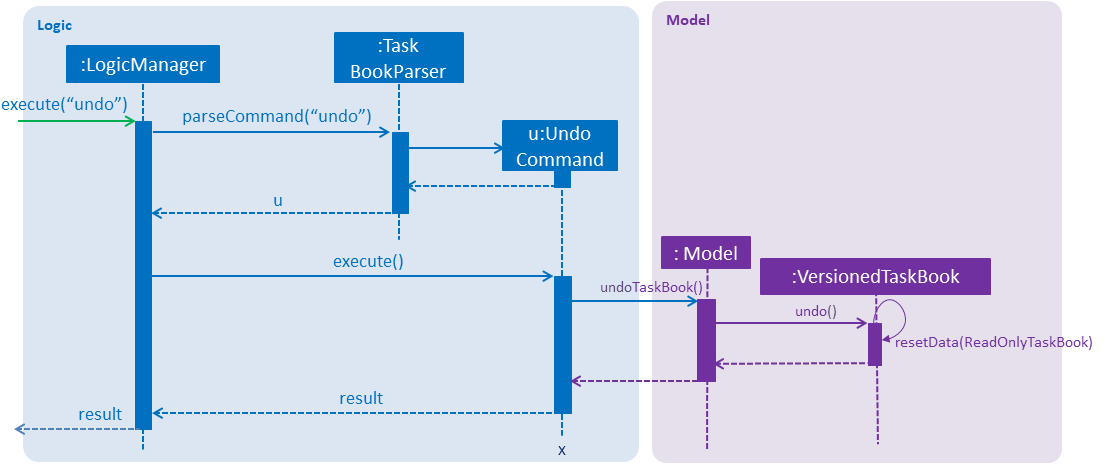
The following sequence diagram shows how the undo operation works:
The redo command does the opposite — it calls Model#redoTaskBook(), which shifts the currentStatePointer once to the right, pointing to the previously undone state, and restores the task book to that state.
If the currentStatePointer is at index taskBookStateList.size() - 1, pointing to the latest task book state, then there are no undone task book states to restore. The redo command uses Model#canRedoTaskBook() to check if this is the case. If so, it will return an error to the user rather than attempting to perform the redo.
|
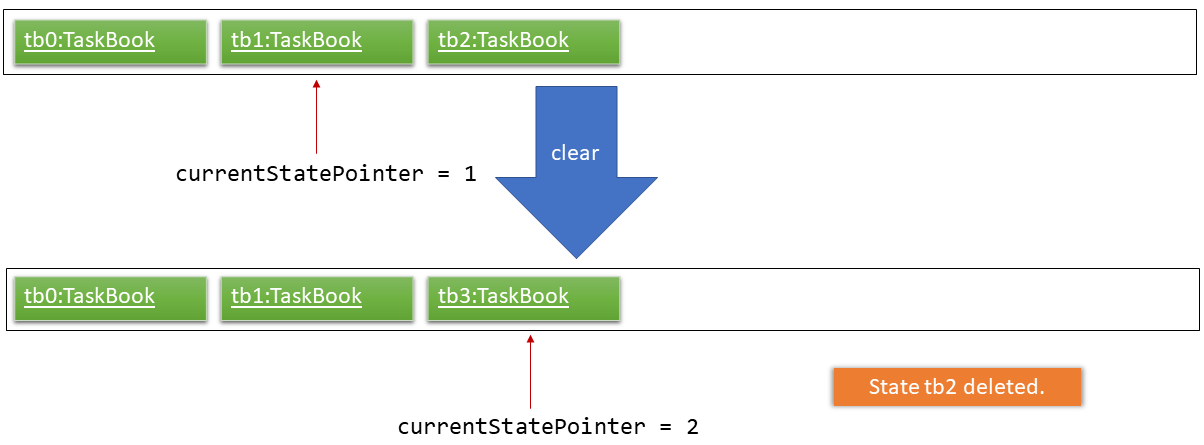
Step 5: The user then decides to execute the command list. Commands that do not modify the task book, such as list, will usually not call Model#commitTaskBook(), Model#undoTaskBook() or Model#redoTaskBook(). Thus, the taskBookStateList remains unchanged.
Step 6. The user executes clear with no parameter, which calls Model#commitTaskBook(). Since the currentStatePointer is not pointing at the end of the taskBookStateList, all task book states after the currentStatePointer will be purged. We designed it this way because it no longer makes sense to redo the add n/CS2113 … command. This is the behavior that most modern desktop applications follow.
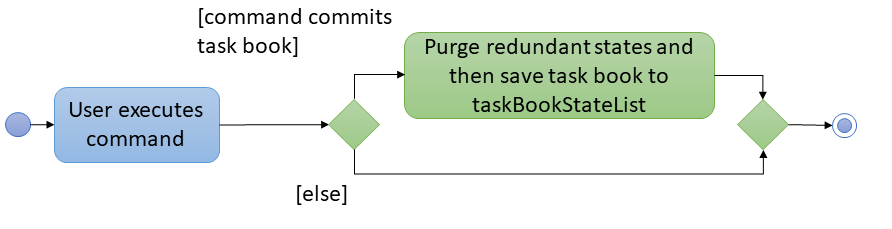
The following activity diagram summarizes what happens when a user executes a new command:
4.2.2. Design Considerations
Aspect: How undo & redo executes
-
Alternative 1 (current choice): Saves the entire task book.
-
Pros: Easy to implement.
-
Cons: May have performance issues in terms of memory usage.
-
-
Alternative 2: Individual command knows how to undo/redo by itself.
-
Pros: Will use less memory (e.g. for
delete, just save the task being deleted). -
Cons: We must ensure that the implementation of each individual command are correct.
-
Aspect: Data structure to support the undo/redo commands
-
Alternative 1 (current choice): Use a list to store the history of task book states.
-
Pros: Easy for new Computer Science student undergraduates to understand, who are likely to be the new incoming developers of our project.
-
Cons: Logic is duplicated twice. For example, when a new command is executed, we must remember to update both
HistoryManagerandVersionedTaskBook.
-
-
Alternative 2: Use
HistoryManagerfor undo/redo-
Pros: We do not need to maintain a separate list, and just reuse what is already in the codebase.
-
Cons: Requires dealing with commands that have already been undone: We must remember to skip these commands. Violates Single Responsibility Principle and Separation of Concerns as
HistoryManagernow needs to do two different things.
-
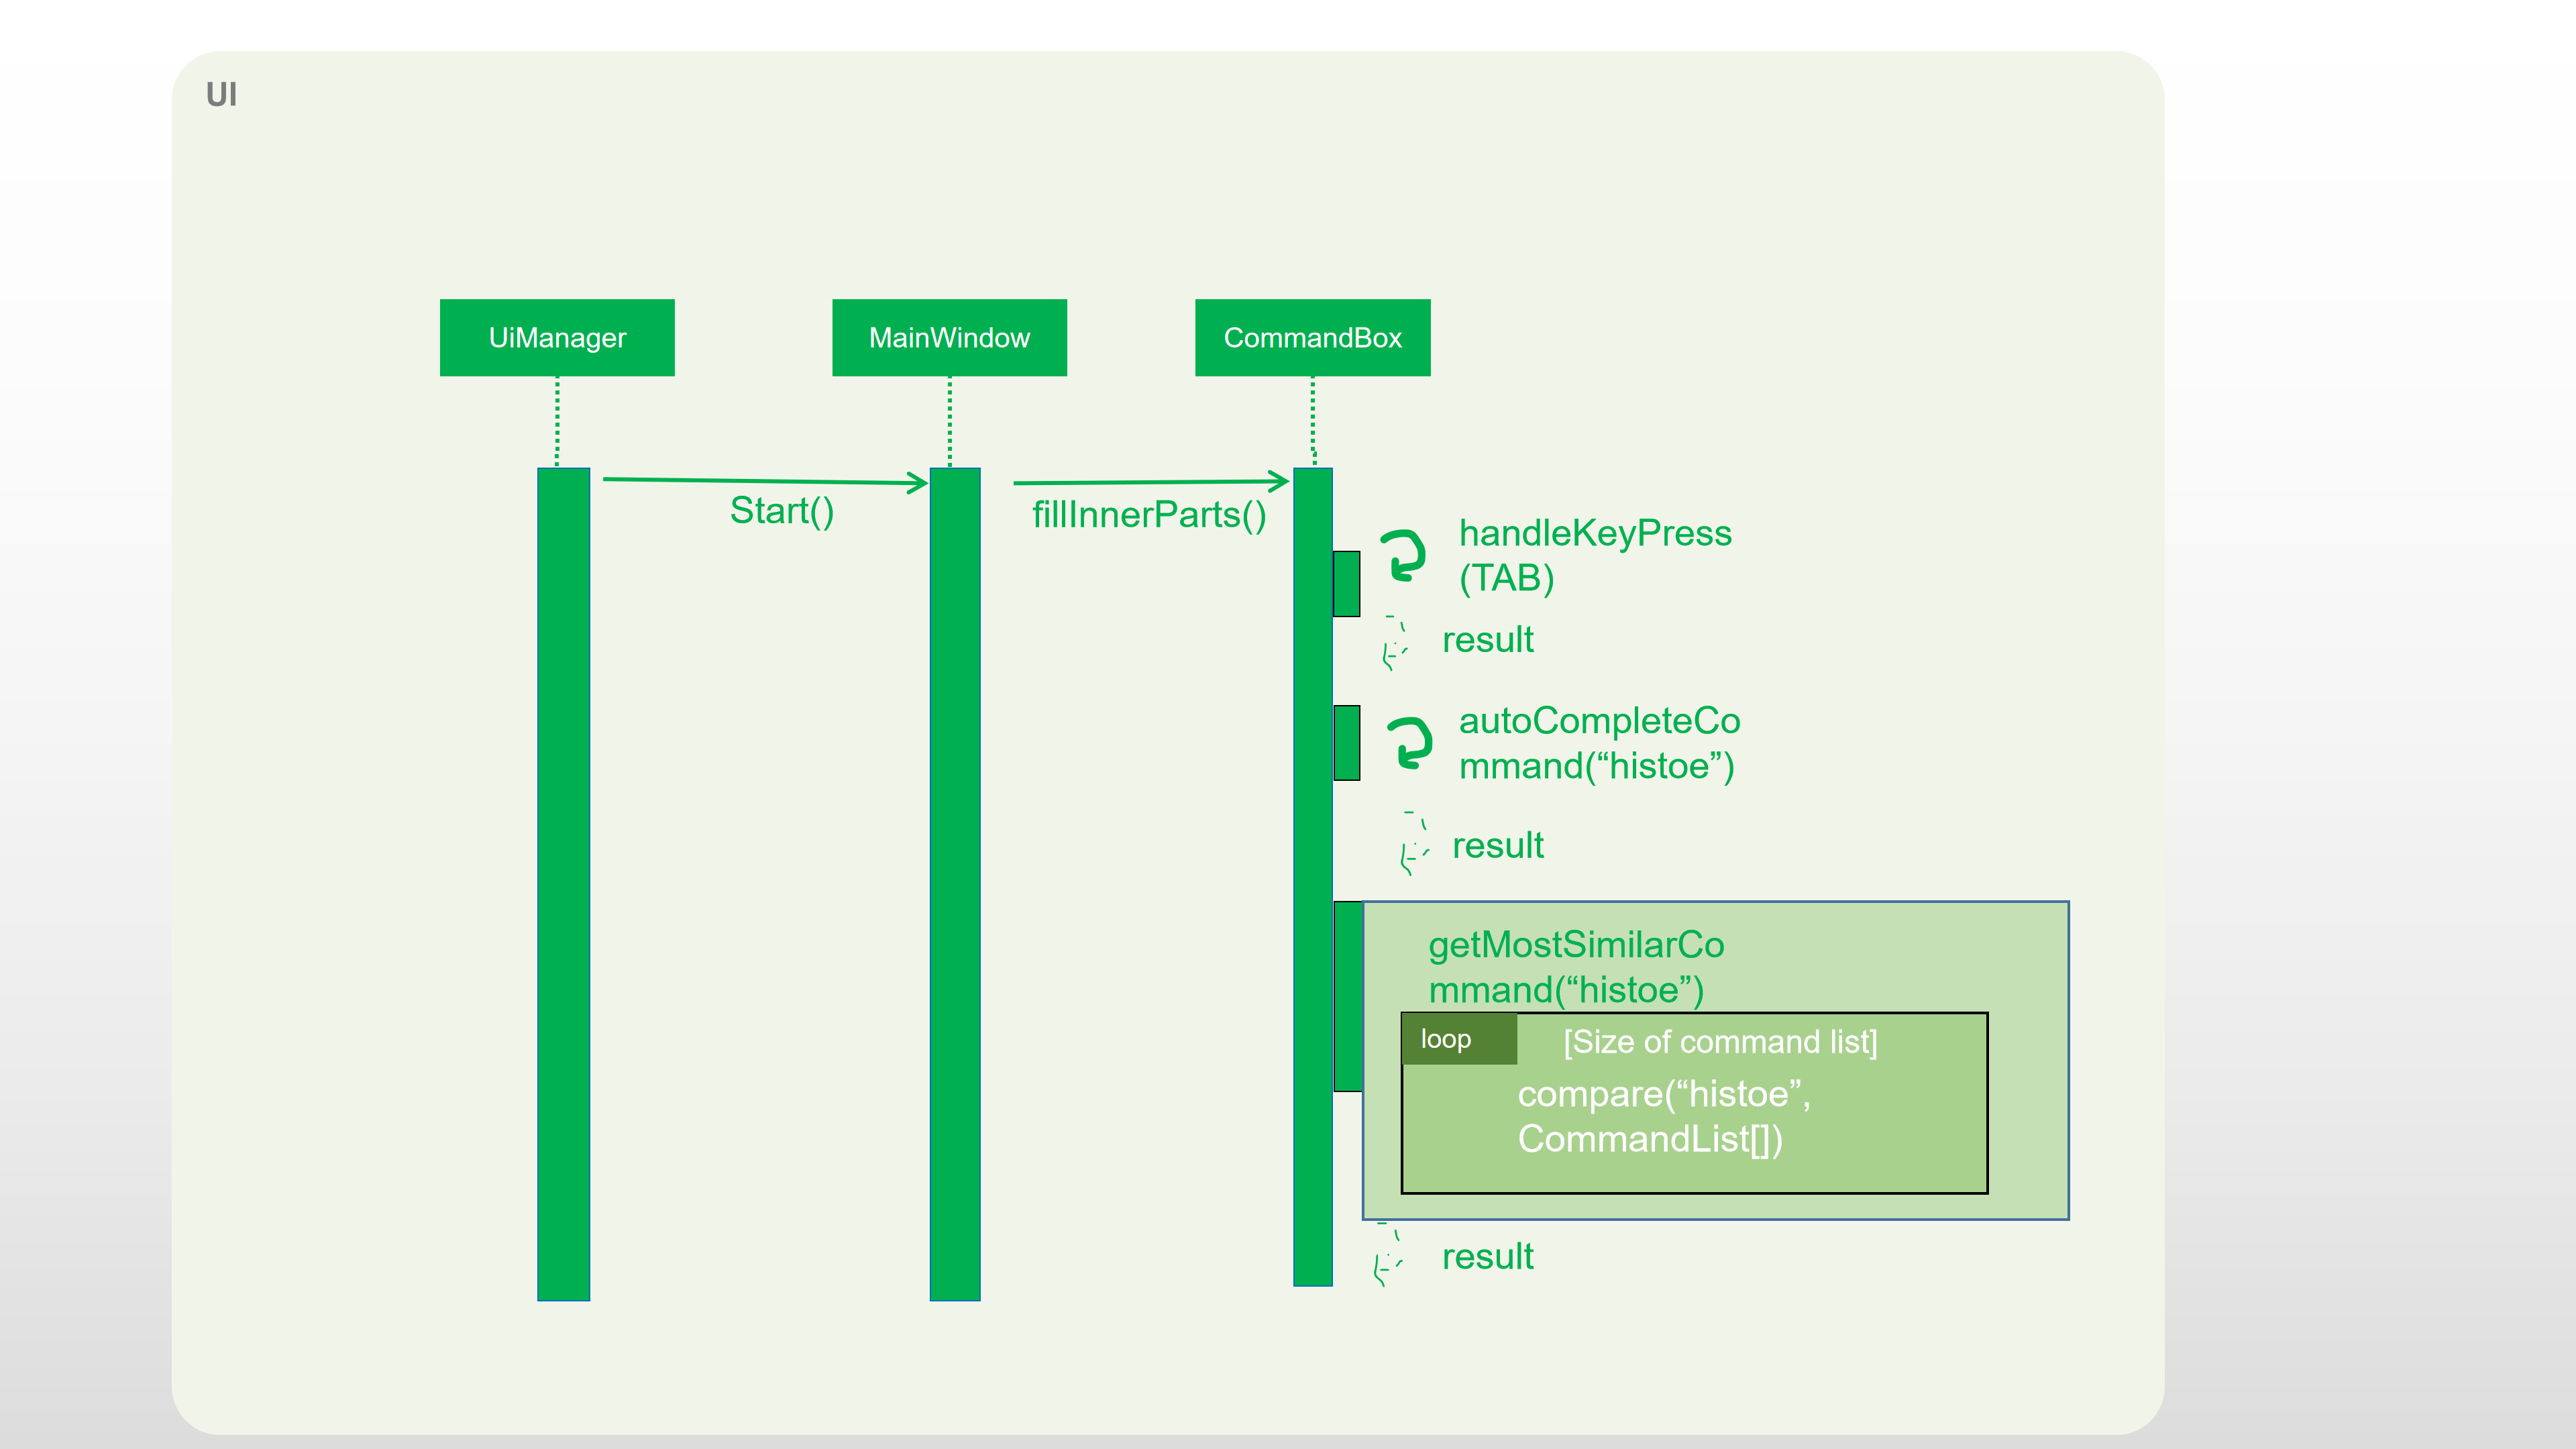
4.3. Automatically complete input command feature
Auto-complete uses tab as a signal to trigger auto-complete and the command box will automatically complete the incomplete input.
4.3.1. Current Implementation
When a user press TAB key, if the command is incomplete, Auto-complete feature will fulfill the automatically. If the command is completed, Auto- complete feature will fulfill the format string of corresponding parameters of the command.
Given below is an example usage of how the WrongCommandSuggestion behaves at each step.
Step 1: The user type an command in command line and press TAB from keyboard.
Step 2: The command will be compared with CommandBox#CommandList. If the typed command is in CommandBox#CommandList, which means it is a valid command, then call CommandBox#showParameterForCommand() to fulfill the format string of parameters of the command.
Step 3: Otherwise, TAB will call CommandBox#autoCompleteInputCommand() to fulfill the incomplete command.
Step 4: CommandBox#autoCompleteInputCommand() will call CommandBox#getMostSimilarCommand() to get the most similar command from Comm,andBox#CommandList.
Step 4: CommandBox#getMostSimilarCommand() will call CommandBox#compare() to get the similarity by caculating the times of editing needed for changing the input command into command in CommandBox#CommandList.
Step 5: If the similarity between the input command and the most similar command is more than 0.5, then replace the incomplete command with the most similar command. Otherwise, fulfill the command line with "No matched command".
The following sequence diagram shows an example of how the Auto-complete operation works with incomplete command histoe (closest command is history):
4.3.2. Design Considerations
-
Alternative 1: Auto-complete the input command by that if the input incomplete command is a substring of a command in CommandList, fulfill the input command with that command.
-
Pros: Simple.
-
Cons: If the user wrongly types the incomplete command, it can not correct them.
-
-
Alternative 2(current choice):if the input incomplete command is a substring of a command in CommandList, fulfill the input command with that command. If the input incomplete command is not a substring of any commands in CommandList, caculate the similarity and return the most similar command by applying a math concept: Levenshtein Distance.
-
Pros: Even if the user wrongly type a command, Auto-complete feature can correct it.
-
Cons: Difficult to design the algorithm.
-
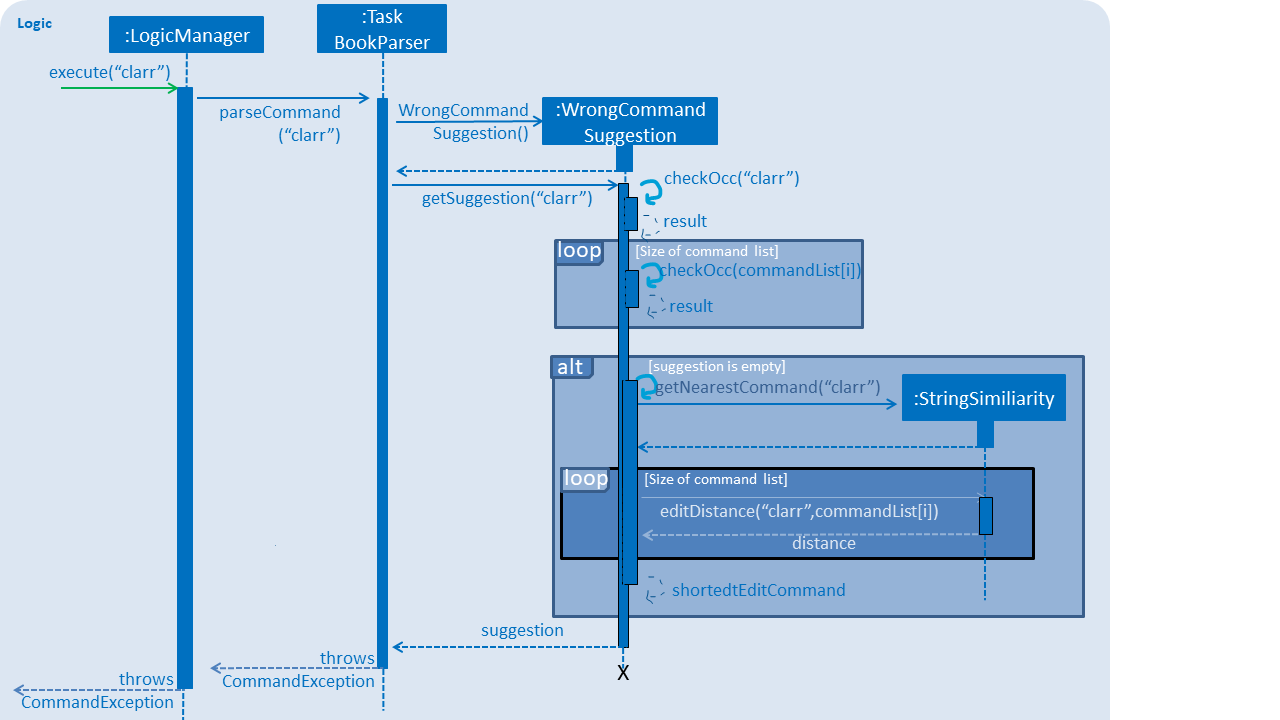
4.4. Wrong Command Suggestion feature
The suggestions feature gives users helpful suggestions on what command to type, and corrections for commands when incorrect commands are being entered.
4.4.1. Current Implementation
When a user completes entering a command (after pressing ENTER key), if the command typed is invalid, the system will suggest a similar command based on the edit distance (which will be explained later).
Given below is an example usage of how the WrongCommandSuggestion behaves at each step.
Step 1: The user would type in the command string wrongly.
Step 2: The command would be parsed into the TaskBookParser class. Since no commands match the word exactly, it would fall into the default case.
Step 3: The default case would extract out only the command portion of the user input, and input it into the WrongCommandSuggestion class.
Step 4: WrongCommandSuggestion would first check the alphabets occurrence in the command word typed by users, if there is any correct command word has the same alphabets occurrence, WrongCommandSuggestion will return this command word immediately.
Step 5: Otherwise, WrongCommandSuggestion then would then instantiate the StringSimilarity class to find the nearest match of a word.
Step 6: editDistance in StringSimliarity class would be called to find out the edit distance between two words. These two words would be the wrong command the user has input, and the list of available commands in the whole application.
Step 7: WrongCommandSuggestion would then compare if the edit distance of the current command is shorter than the current shortest edit distance command (which is initialised to 3 edits). If it is shorter, it would then suggest the current command.
Step 8: WrongCommandSuggestion would then return the suggestion in a string, which would then be inputted into the CommandException, to be thrown to the LogicManager class.
The following sequence diagram shows an example of how the WrongCommandSuggestion operation works with wrongly spelt command clarr (closest command is clear):
4.4.2. Design Considerations
-
Alternative 1: Compare the input command and the actual command character by character and see which command has the most matches.
-
Pros: Easy to implement.
-
Cons: Not as accurate or reliable in terms of giving a correct match of command.
-
-
Alternative 2: Use a string matching algorithm to implement the matching and difference calculation between the command and the user input.
-
Pros: Accurate prediction or suggestions from actual commands.
-
Cons: Difficult to implement, and might require more processing overhead.
-
-
Alternative 3(current choice): Combination of the two.
-
Pros: More accurate prediction.
-
Cons: More difficult to implement.
-
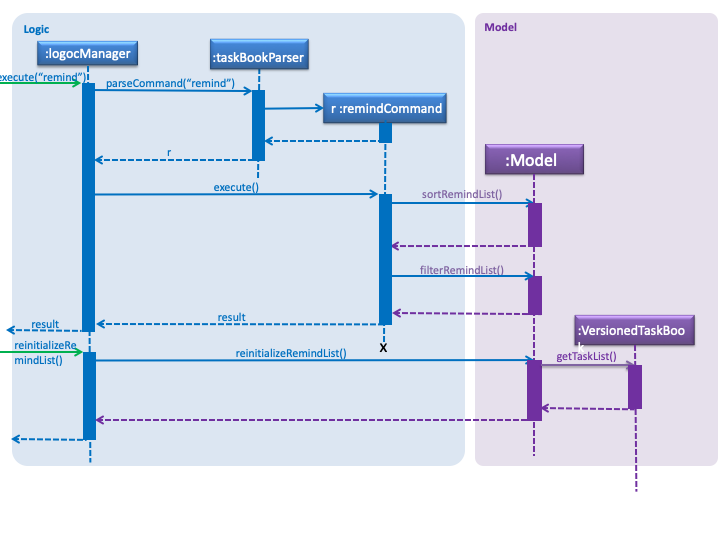
4.5. Reminder feature
This feature will show user a remind list when remind command is requested. The remind list is a task list sorted by start time or deadline.
4.5.1. Current Implementation
We maintain a reminder list in each model. Note that each time user can ask for any category of tasks to be reminded, which means the remind list should contains all the tasks in Tasketch to be filtered. When the app runs, remind list will be initialised to be a FXCollections list of all the tasks in Tasketch.
Remind feature has two formats of command:
-
a)
remind [start/ddl] -
b)
remind [category] [start/ddl]
they follows the following steps:
-
Step 1 : Sort remind list.
-
When
remind [start/ddl]is requested, sortRemindListByStart() / sortRemindListByEnd() will be called. These two method will sort the remind list by start time or deadline of a task. -
When
remind [category] [start/ddl]is requested, Tasketh will first do the same thing as described above. In addition, it will call filterRemindList() method to filter the remind list to contain only tasks with the specified category.
-
-
Step 2 : Update the UI.
The UI part of reminder is managed by ReminderPane class. After remind list is sorted. We update the UI of reminder in MainWindow by calling setReminder() method. setReminder() is implemented using ReminderPane. -
Step 3 : Re-initialize remind list.
Call reinitialzeRemindList() method in MainWindow to set remind list to be a FXCollections list of all the tasks.
| The reason of doing this is when we show the remind list in UI, we change it from FXCollections list to a Observable list. However, in current implementation, sorting method can only be applied to FXCollections list. So we need to re-initialize remind list to be a FXCollections list containing all the tasks after each call of remind command. |
4.5.2. Design Consideration
-
Alternative 1: Use filteredTaskList as the remind list and all operations which are related to reminder are done to filteredTaskList.
-
Pros: Very easy to implement.
-
Cons: It is not user friendly. When user execute command like "list", "filteredTaskList" will change and as a result the remind list will also change. However, remind list is expected to be concise and up-to-date. It should point to all tasks in storage instead of filteredTaskList and only change when commands like "add" and "delete" are executed.
-
-
Alternative 2 (current choice): Implement a separate remind list in model and maintain the remind list whenever the tasks in storage change.
-
Pros: It is user friendly. As long as users don’t change the tasks in the storage, remind list will remain the same. When users make change to tasks, remind command will update remind list.
-
Cons: Hard to implement. Developers need to implement a separate bunch of methods in logic and model interface and class to maintain the remind list.
-
4.6. Effective Visualization feature
4.6.1. Current Implementation
There are mainly two parts in this features, calendar and timeline arrangement
These two parts will help the user better arrange their time usage by visualization of time.
-
There are currently two commands with parameters to help achieve this,
monthandtimeline.-
Implementation for Calendar: Using
GridPaneto separate the whole calendar area into 35 grids.-
Each one of the 35 grids is filled with PaneNode which is defined as area for a day.
-
PaneNode extends AnchorPane.
-
-
Implementation for Timeline: Using JavaFx and segment each part of the browserPanel.
-
First, separate the whole
browserPanelinto 2 parts:upperPaneandtimelinePane. -
Second, separate the
upperPaneintocalendarPaneandreminderPane. -
The whole implementation of
timelineis intimelinePaneusing JavaFx. -
The overall structure is JavaFx VBox, which is a vertical arrangement structure.
-
Inside the VBox, there are key time points for interval of 2 hours. Then the next is timeline for each category.
-
-
4.6.2. Design Considerations
Aspect: How timeline executes
-
Alternative 1 (current choice): Delete current timeline area and re-render timeline.
-
Pros: Easy to implement. User has the freedom to choose which day to display.
-
Cons: May have performance issues in terms of execution and computation power.
-
-
Alternative 2: The timeline is auto-updated after each
addoreditcommand.-
Pros: More intuitive to use.
-
Cons: User lost the freedom to choose which day to display the timeline.
-
Aspect: Special Data structure to support timeline commands
-
Alternative 1 (current choice): Use a 2-D array to store of PreTask objects instead of using Task objects.
-
Pros: Saves memory since filtering requires a copy of task details.
-
Cons: Similar class is created. Not very friendly to maintain.
-
-
Alternative 2: Use a 2-D array to store Task objects.
-
Pros: More intuitive and easy to implement since no new class is created.
-
Cons: Requires more memory and computational power.
-
4.7. Daily Time Planner feature
Daily Time Planner uses the information of tasks added, such as start date, end date, start time, end time and category.
4.7.1. Current Implementation
Start date and end date are used to identify whether the task added is a daily task, same dates mean that it is a daily
task or else it is a long term task which is not meant for daily time planning. Thus, that task will be added to
Daily Time Planner for monitoring.
Start time and end time are used for calculating the time period of that task and to be added into the accumulated time
for a category for that date of a task. ( eg. if the task with date 13-03-19 is a category academic task, its calculated
time period will be added to the academic accumulated time in the day 13-03-19. ) These information is passed to the
calculateTime() method in Day object in the form of string.
Besides Task model being used to represent all the tasks added, there is also Day model to represent all the days
which stores information (date and accumulated time of that 5 task categories) of the tasks added to that day.
Each new Task added will not create new Day objects, instead it will either update the category times of that Day
if the new task added has the same date (same start date), or create a new Day only if there no days that have the same
date.
|
Data Structure
TaskBook needs data structure to store data. Besides the ObservableList named UniqueTaskList to store all the tasks,
there is also another ObservableList named UniqueDayList to store all the days.
| Observable List is used to observe a list so that when there is change in the list, it will notified (listeners) all the other components that utilizing this Observable List data and do the necessary updates in their own data. |
Besides those 2 mentioned above, a HashMap named dayMap is used to store another set of Day objects which are
identical to the UniqueDayList.
-
Alternative 1 (current choice): As described above
-
Pros: Faster in finding a
Dayobject as it uses a key (start date of a task) to add into and find in the hash map. -
Cons: Double work as it needs to add into and remove the
Dayobject from bothUniqueDayListanddayMap.
-
-
Alternative 2: Using the
UniqueDayListonly-
Pros: No extra work needed as adding and removing happens only to one data structure.
-
Cons: Finding a
Dayobject will be slower when there are large amountDayobjects, as it needs to iterate through the list.
-
However, dayMap cannot be implemented alone as it doesn’t have the ability to observe and notified the listeners when
there is a change and to update the UI. So, it has to be implemented with an ObservableList.
Since a new TaskBook is created each time undo and redo command executed as VersionedTaskBook extends TaskBook,
the data of the latest UniqueTaskList and UniqueDayList will need to transferred to the new TaskBook through
resetData(ReadOnlyTaskBook newData).
|
dayMap will be a reinitialised to new HashMap as the data in UniqueDayList is inaccurate during resetData(ReadOnlyTaskBook newData).
So, it is better to start in clean state and re-add all the time period of all tasks in the UniqueTaskList. The
UniqueDayList will be updated as well.
|
4.7.2. Enhancement to add Command
To ensure the Daily Time Planner works as it intended, some input checks have been implemented to properly guide and to
ensure the user to input the add command correctly.
Adding Daily Task
With the user inputs, the app will check the start and end dates. If the dates are identical, meaning it is a daily task,
then the start and end times will be checked through CheckValidTime(Task) because it is not correct to have a task to
end even before it starts.
If the CheckValidTime(Task) results false, the system will throw exception and inform the
user that it is an invalid command and tell the user that start time must be before the end time.
Adding Long Term Task
If the dates are not identical, it only means that the task ends after few days from the start date or it can be end date
is before start date. In order to verify this, the start and end dates need to be checked through CheckValidDate(Task).
If CheckValidDate(Task) results negative, the system will throw exception and inform the user that it is an invalid
command and tell the user that start date must be before the end date. If it results positive, the system will proceed to
check the start and end times through CheckValidTime(Task) to ensure that the end time is after the start time. If it
results negative, the system will throw exception and inform the user that it is an invalid command and tell the user
that start time must be before the end time.
If both CheckValidDate(Task) and CheckValidTime(Task) are passed, then it is a valid command.
The system will also check for the date and time format. For dates (dd-mm-yy), the days should be more than 0 and less than 32,
months should be more than 0 and less than 13. For times (hh.mm), the hours should range from 0 to 23, while
the minutes range from 0 to 59.
If the formats are violated, error message with correct usage will be prompted.
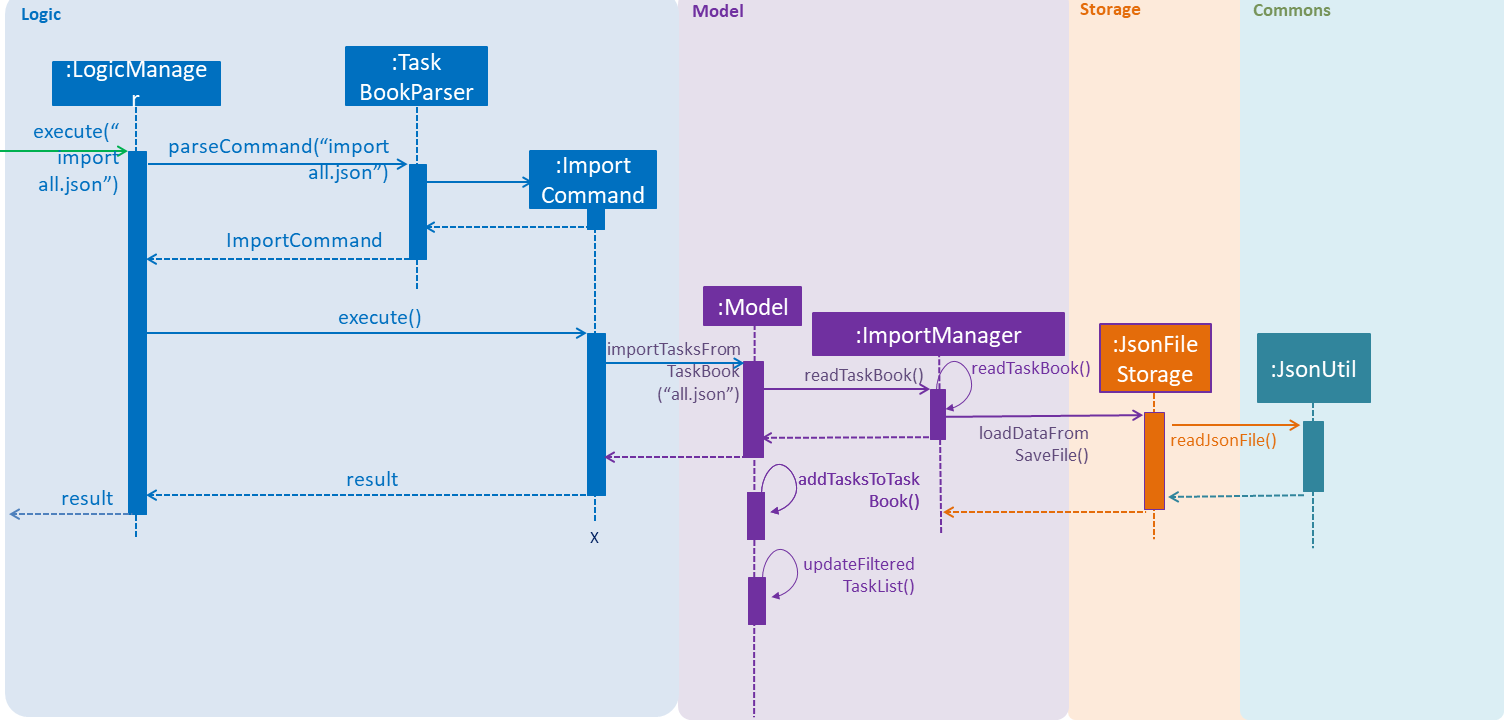
4.8. Import/Export feature
4.8.1. Current Implementation
Import
This operation is exposed in the Model interface as Model#importTaskBook().
Given below is an example usage scenario and how the export mechanism behaves at each step.
Step 1: The user calls the import command.
Step 2: The LogicManager calls parseCommand with the user input.
Step 3: The TaskBookParser is called and it returns a ImportCommand object to LogicManager.
Step 4: The LogicManager calls execute() on the ImportCommand object
Step 5: The Logic component then interacts with the Model component by calling Model#importTasksFromTaskBook().
Step 6: The Model interface creates a new Import object and then pass the filePath to the ImportManager.
Step 7: The ModelManager will call ImportManager#readTaskBook() and get a ReadOnlyTaskBook object.
|
The ImportManager class will first check whether the task in the file exists in Tasketch, if there is an existing task, just ignore this task. |
Step 8: The ImportManager will then will call JsonFileStorage#loadDataFromSaveFile().
Step 9: The JsonFileStorage will then will call JsonUtil#readJsonFile().
Step 10: And then the ModelManager will then will call addTasksToTaskBook().
Step 11: If there is any new task added, the ModelManager will then call Model#updateFilteredTaskList() .
The following sequence diagram shows how the Import operation works:
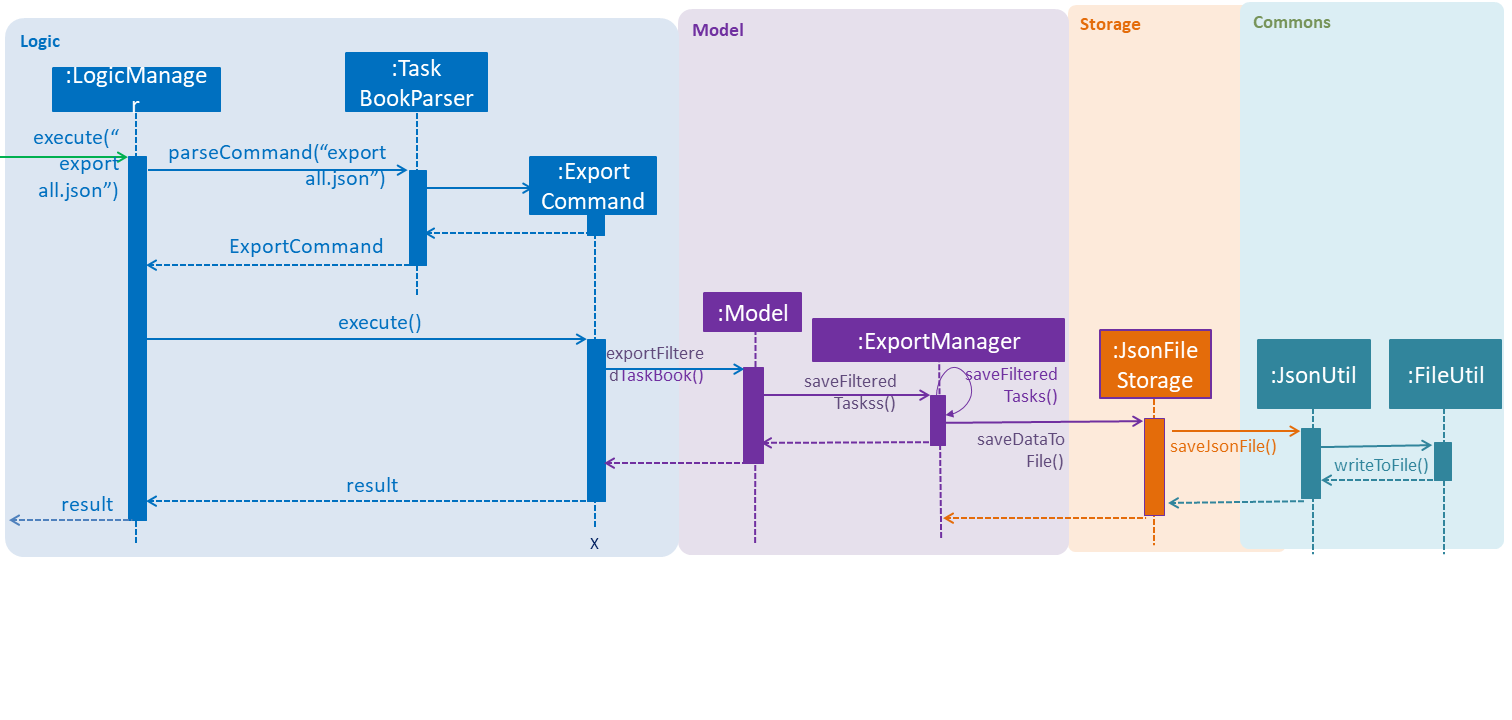
Export
This operation is exposed in the Model interface as Model#exportTaskBook().
Given below is an example usage scenario and how the export mechanism behaves at each step.
Step 1: The user calls the export command.
Step 2: The LogicManager calls parseCommand with the user input.
Step 3: The TaskBookParser is called and it returns a ExportCommand object to LogicManager.
Step 4: The LogicManager calls execute() on the ExportCommand object
Step 5: The Logic component then interacts with the Model component by calling Model#exportFilteredTaskBook() of the Model interface.
Step 6: The Model interface creates a new Export object and then pass the filteredTaskList.
Step 7: The ExportManager object calls ExportManager#saveFilteredTasks().
Step 8: Then ExportManager class will call JsonFileStorage#saveDataToFile().
Step 9: The JsonFileStorage class will call JsonUtil#saveJsonFile().
Step 10: The JsonUtil class will call FileUtil#writeToFile().
Step 11: The FileUtil class will finally call File#write().
|
This File object will creates a new file if there is no existing file with the same name. And if there is an existing file, it will just write to this file no matter it is empty or not. |
The following sequence diagram shows how the Export operation works:
4.8.2. Design Considerations
Aspect: Use what kind of file
-
Alternative 1 (current choice): Json file
-
Pros: Easier to implement because the addressbook itself uses Json file to store the data.
-
Cons: Hard for users to read about the exported file.
-
-
Alternative 2: Xml file
-
Pros: Xml is more widely used and it shows tha data better.
-
Cons: Hard to implement.
-
4.9. Logging
We are using java.util.logging package for logging. The LogsCenter class is used to manage the logging levels and logging destinations.
-
The logging level can be controlled using the
logLevelsetting in the configuration file (See Section 4.10, “Configuration”) -
The
Loggerfor a class can be obtained usingLogsCenter.getLogger(Class)which will log messages according to the specified logging level -
Currently log messages are output through:
Consoleand to a.logfile.
Logging Levels
-
SEVERE: Critical problem detected which may possibly cause the termination of the application -
WARNING: Can continue, but with caution -
INFO: Information showing the noteworthy actions by the App -
FINE: Details that is not usually noteworthy but may be useful in debugging e.g. print the actual list instead of just its size
4.10. Configuration
Certain properties of the application can be controlled (e.g user prefs file location, logging level) through the configuration file (default: config.json).
Appendix A: Product Scope
Target user profile:
-
NUS students who need to manage time due to multiple CCAs, tasks, assignments and datelines
-
Prefers typing over mouse input
-
Is reasonably comfortable using CLI apps
Value proposition: Manage all the tasks and assignments by giving each of them a time period.
Appendix B: User Stories
Priorities: High (must have) - * * *, Medium (nice to have) - * *, Low (unlikely to have) - *
| Priority | As a … | I want to … | So that I can… |
|---|---|---|---|
|
user |
add task |
manage multiple tasks |
|
user |
delete task |
get rid of a task that no longer want to do |
|
user |
edit task |
change the all the information of the task |
|
user |
clear tasks |
remove all the completed tasks of a day or a month or all the finished tasks |
|
user |
find tasks |
check the full information of the task when forgetting the task description |
|
user |
list tasks |
know what task is on that day |
|
user |
See the calendar |
know how much workload is on that day |
|
user |
Visualize the timeline |
what is the time flow for the whole day |
|
user |
record total time spent on each classified task type |
see how much time they spend on a specific task type each day |
|
user |
show summary of time planned on a day |
plan future tasks more effectively |
|
user |
undo/redo a command |
remove/redo a command that I entered/removed by mistake |
|
user |
know today’s date |
sure of today’s date |
|
user |
add priority of the task |
set the importance of an task |
|
user |
view priority of all events |
see all the events based on the priority |
|
user |
list tasks of certain priority of this week |
know what must be done in this week |
|
user |
classify a task |
separate different tasks |
|
user |
search tasks by classification |
see different tasks based on the classification |
|
user |
write reflection |
write their daily reflection |
|
user |
have alarm |
remind myself of the coming events |
|
user |
change the color for the calendar |
choose different version of different color of calendar |
|
user |
play music |
be entertained when working on the desk |
|
user |
find out weather condition for current location |
plan the next action, like to bring umbrella or not |
Appendix C: User cases
(For all use cases below, the System is the ProjectManager and the Actor is the user, unless specified otherwise)
Add a task
MSS
-
User requests to create a task
-
1a. User submits the following information. [Task Name] [Start date] [Start time] [End date] [End time] [Description] [Task category] [Tag]
-
-
TaskBook add that task into the task list
Use case ends.
Extensions
-
1a1 Missing information
-
1a1a TaskBook displays error message
Use case resumes at step 1
-
Editing a task
MSS
-
User request edit -taskID [id] -s [startDateTime] -e [endDateTime] -t [topic] -d [description]
-
TaskBook lists the details of a task and user can edit the description of the task.
Use case ends
Find a task
MSS
-
User request find [keyWords/subString]
-
TaskBook will list all the tasks which satisfy the searching condition.
Use case ends.
Delete a task
MSS
-
User request delete [task] [keywords]
-
TaskBook list all the task satisfy that keywords condition
-
TaskBook remove that task.
Use case ends
Clear tasks by time period
MSS
-
User request clear all
-
TaskBook removes all the tasks in Tasketch.
Use case ends.
Extension
-
User request clear [Date]
-
TaskBook removes the tasks which start from that day.
Use case ends.
-
User request clear [Month]
-
TaskBook removes the tasks which start from that month.
Use case ends.
List tasks by time period
MSS
-
User request list of all tasks
-
TaskBook shows a list of tasks of the current day by default.
Use case ends.
Extension
-
User request list all
-
TaskBook shows a list of all the tasks.
-
Use case ends.
-
User request list [Date]
-
TaskBook shows a list of tasks of that specific date.
-
Use case ends.
-
User request list [Month]
-
TaskBook shows a list of tasks of that month
-
Use case ends.
Reminder feature
MSS
-
User request for a reminder.
-
TaskBook shows a list of tasks which have nearest start time or deadline.
-
Extension
-
User request for a reminder of certain category of tasks.
-
TaskBook shows a list of tasks with the specified category which have nearest start time or deadline.
-
Help
MSS
-
User requests help
-
TaskBook shows a list of commands with the examples of their usage
Use case ends.
Exit
MSS
-
User request for exiting the program
-
TaskBook saves all the changes and exits.
Use case ends.
Appendix D: Non-functional requirements
-
Should work on any mainstream OS as long as it has Java 9 (revision 1.8.0_201 or higher) installed.
-
Should be able to hold up to 1000 tasks without a noticeable sluggishness in performance for typical usage.
-
A user with above average typing speed for regular English text (i.e. not code, not system admin commands) should be able to accomplish most of the tasks faster using commands than using the mouse.
Appendix E: Glossary
-
Mainstream OS: Windows, Linux, Unix, OS-X
Appendix F: Instruction for Manual Testing
F.1. Daily Time Planner
To get started, you must first add a task. So, the inputs will be checked by the system, especially the Start and End Date as well as the Start and End Time.
Adding Daily Task
Meaning that the Start Date is same as the End Date. You should see the time period correspond to its start date will be added
into the Day list where all the summary of time planned for each categories on each day is found.
Format: add n/TASK_NAME sd/START_DATE st/START_TIME ed/END_DATE et/END_TIME d/DESCRIPTION c/CATEGORIES [t/TAG][t/TAG]
Example:
-
add n/CS2113 task sd/13-03-19 st/12.00 ed/13-03-19 et/14.00 d/Talk about version control c/a
This command is a valid command as the Start and End Dates are the same and the Start Time is before the End Time. -
add n/CS2113 task sd/13-03-19 st/12.00 ed/13-03-19 et/10.00 d/Talk about version control c/a
This command is not a valid command as the Start Time is after the End Time. The system will prompt a message of "Adding daily task, Start Time must be before End Time!".
Adding Long Term Task
Meaning that the Start Date is different from the End Date. There will be no change in the Day list.
Example:
-
add n/CS2113 task sd/12-03-19 st/12.00 ed/13-03-19 et/14.00 d/Talk about version control c/a
This command is a valid command as the Start Date is before End Date and the Start Time is before End Time. -
add n/CS2113 task sd/14-03-19 st/12.00 ed/13-03-19 et/14.00 d/Talk about version control c/a
This is not a valid command as the Start Date is after End Date. The system will prompt a message of "Start Date must be before End Date!". -
add n/CS2113 task sd/12-03-19 st/12.00 ed/13-03-19 et/10.00 d/Talk about version control c/a
This is not a valid command as the Start Time is after End Time eventhough the dates are correct. The system will prompt a message of "Start Time must be before End Time!".
Valid Date and Time Check
For adding both daily and long term tasks, the dates and the times will be checked as well to ensure that the format is
correct.
Dates are in 'dd-mm-yy' format, the user will need to input the exact format, eg. 13-03-19. The system is not smart enough to detect whether the day is correct for that month, so you will need to ensure the correctness yourself. However, the system will not allow days more than 31 and less than 1, while months not more than 12 and less than 1.
Example:
-
add n/CS2113 task sd/31.03.19 st/12.00 ed/13.03.19 et/14.00 d/Talk about version control c/a
This command is invalid because the date format is wrong, should be using '-' instead of '.' symbol in between. -
add n/CS2113 task sd/32-03-19 st/12.00 ed/13-03-19 et/14.00 d/Talk about version control c/a
This command is invalid because the day exceeds 31. -
add n/CS2113 task sd/00-03-19 st/12.00 ed/13-03-19 et/14.00 d/Talk about version control c/a
This command is invalid because the day is less than 1. -
add n/CS2113 task sd/13-13-19 st/12.00 ed/13-03-19 et/14.00 d/Talk about version control c/a
This command is invalid because the month exceeds 12. -
add n/CS2113 task sd/13-00-19 st/12.00 ed/13-03-19 et/14.00 d/Talk about version control c/a
This command is invalid because the month less than 1.
Meanwhile, the times are in 24-hr format and in 'hh.mm' format, the user will need to input the exact format, eg. 08.00. the system will not allow hours more than 23 and less than 0, while minutes not more than 59 and less than 0.
Example:
-
add n/CS2113 task sd/31-03-19 st/12:00 ed/13-03-19 et/14:00 d/Talk about version control c/a
This command is invalid because the time format is wrong, should be using '.' instead of ':' symbol in between. -
add n/CS2113 task sd/12-03-19 st/24.00 ed/13-03-19 et/14.00 d/Talk about version control c/a
This command is invalid because the hour exceeds 23. -
add n/CS2113 task sd/12-03-19 st/23.60 ed/13-03-19 et/14.00 d/Talk about version control c/a
This command is invalid because the minute exceeds 59.
Showing Daily Summary Only tasks with same Start Date and End Date will be shown here. If there 2 tasks with same Start Date but one of the task has different End Date, then only the task with the same Start Date and End Date will appear in the summary / Day list.
Example:
-
add n/CS2113 task sd/13-03-19 st/12.00 ed/13-03-19 et/14.00 d/Talk about version control c/a -
add n/CS2003 task sd/13-03-19 st/12.00 ed/14-03-19 et/14.00 d/Talk about test c/a -
showtime
You should see for the date '13-03-19', academic time only has 2 hours (14.00-12.00=2.00, showing 2.0 instead) in the Day list.
Look for the index number of the task named 'CS2003' in the task list.
4. edit [index number] ed/13-03-19
You should see for the date '13-03-19', academic time has 4 hours now ((14.00-12.00)+(14.00-12.00)=4.00, showing 4.0 instead) in the Day list.
If you trying to find a particular date in the day list. For example, '13-03-19', use showtime 13-03 or showtime 13-03-19. If the date is not in the day list, you will see empty list.
Invalid commands like showtime sfsf will prompt error message with the correct usage.
=== Timeline visualization
Assuming that you followed the procedure given above, there should be a few tasks added to your Tasketch.
Such that you could test timeline using the above tasks.
Viewing timeline
In order to test the timeline, you are encouraged to follow the steps below.
Format: timeline [DATE]
Example:
-
timeline 13-03-19
This command will display the tasks we just added whose start date is 13-03-19.